Thursday, November 14, 2013

A new doorway...and more bamboo flooring...


So we decided that we wanted to open up the wall into the larger living from....here is it framed in, and after we got some flooring down..

Monday, October 28, 2013

Building a mini brewery

While renovating the house I am also building a small home brew operation (17gal capacity or 1/2 bbl in brew lingo) Here is a shot of the whole set up and the Duda Diesel chiller we're using, i'll add some more pics shortly.


First weekends results, 15 gal double IPA and 5 gal oatmeal+chocolate stout

updated 11/14/13 with pics of bottling the first batches, ended up with 6.5 cases of bombers (22 oz) 


Tuesday, October 15, 2013

Replacing a window is never as easy as you think it will be

Here is the starting point, a small window that I would like to replace with a larger one before I remodel the kitchen. Easy right?
It is never as simple as you think....the original window is 36 x 24, I want to go to a 36 x 36 replacement, not a huge change but it will make a difference. So lets get into the wall and see what we're dealing with beside the outlets which will have to move.

Of course, plumbing! This vertical piece of PVC lies right in the path of the planned right edge of my new window, so my options are to move it, or to move the window. Before we go cutting into this pipe lets see whats on the left side.
After taking down the cabinet on the left and removing a little drywall I see we are clear of plumbing on this side, so to make things easier, I'll just shift my new rough opening to the left a little and avoid touching the plumbing or electrical on the right side. Since I'm remodeling the whole kitchen anyway, this little change wont matter.
Next we need to move the studs, replace the header with a longer one and relocate the electrical on the left side. I enlarged the opening a little and removed the insulation.

I then removed the outlet from the stud and exposed the header above the opening. Why is there a 2 x 10 header over what was a 24" opening? It's over kill but not a big deal, did require I go buy some 2x10 which was a minor pain though. Here is the header exposed and the studs on the left removed.


Replacing a window - Part 2

Start over with Part 1

So now that we have the opening restructured on the inside, we are ready to cut back the vinyl siding and trim on the outside, and then enlarge the rough opening. Here is where we are currently inside:
So lets go outside and start to remove the trim. Vinyl trim is usually nailed under the siding, and clipped into a retainer along the window, it helped that i pounded the nails out from the inside first. Be gentle when bending the siding, it's flexible, but it will break if you go too far.
so I have saved the house wrap as best I could and removed the trim, then cut back the siding on the left here. The next step is to do the same thing on the right side

Now our structure is done, the siding is removed, the electrical has been moved, everything is ready to cut the new rough opening...grab the sawz all and...

Wednesday, October 2, 2013

Free efficiency upgrades

Why not get some help making efficiency upgrades?

Depending on where you live, there are programs that are mandated by state and federal governments to provide assistance (free stuff!!) to homeowners to improve the efficiency of their homes. For example, here in Massachusetts there is a program called MassSave provides all kinds of discounts on efficiency products and services. I have bought some intelligent power strips and CFL bulbs from Mass Save at a nice price, and the shipping was fast too. The U.S. Energy Information Administration tracks state programs, hit the link to check what your state is offering, you might be surprised.

Tuesday, September 24, 2013

Optimizing your home for long term efficiency

As I progress through renovating the new house I am replacing several fixtures and appliances, starting with a ceiling fan which lacks a much needed light fixture. So doing all this work with energy efficiency in mind I start browsing Energy Star rated fans at major retailers. As I look through these fans and see all the yes/no binary ratings I am wondering how they are actually compared, and whether efficiency can really be a yes or no question. So upon some further reading on the EnergyStar.gov site, I find that they supply a handy excel sheet with all the products they rate, but much more importantly, they give actual data on each product. Armed with this I start looking at the differences in ceiling fans and it's HUGE! They are compared by using the cfm/watt measurement, this is the cubic feet per minute of air they move for each watt of electricity consumed, the range spans a large gamut of values. I want something in the 50-54 inch diameter range, in this size, at medium speed, fans range from 100 CFM/Watt to 616 CFM/Watt !

So back to Home Depot armed with the list of fans, I see that most of the fans with a CFL light fixture and an energy star label are hovering around that 80-100 cfm/watt level and are around $100.

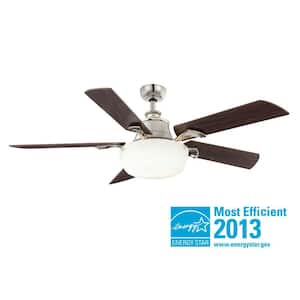
I end up with a Hampton Bay Winfield that moves 327 CFM of air per watt on medium, and looks pretty sharp too. It cost me $209 at Home Depot, so how did I do versus the cheaper non energy star rated fans?

Lets look at usage first, here in New England we run our fans during the winter and the summer, to move the warm and cool air to where you want it. Lets suppose that on average during the summer the fans runs for 8 hours a day for 30 days, and for 12 hours a day for 30 days. then during the winter lets suppose it runs for 6 hours a day for 60 days, for a total use of 960 hours per year. Wow, more than I expected, maybe that's on the high side but lets run with it. So over those 960 hours, the Hampton Bay Winfield uses 8 watts (3493 cfm) x 960 hours = 7680, divide by 1000 and you get 7.680 kWh, the method by which most utilities charge you. I currently pay .14074 per kWh, so the Winfield costs me $1.08 per year to run for 960 hours....wow not bad at all.

Compare to the Hampton Bay Brookhurst which uses 58 watts on medium to move 4468 cfm of air (~77 cfm/watt). Over a year at 960 hours of use this costs $7.83, an increase of $6.75 per year...over the life of the 30 year warranty period that's a savings of  $202.5, its not huge but if you approach every fixture and appliance in your home this way, the savings will add up. Keep in mind this is at today's electricity rate, if this rate climbs over the next few years, the savings just multiply.

Here is the Winfield at Home Depot, check it out.


Sunday, September 22, 2013

Installing strand woven Bamboo flooring correctly

Let's go over some basic tips for installing strand woven bamboo flooring, this flooring product is not like your average hardwood in a few important ways.

First, the strand woven bamboo is very hard and dense, you'll notice it's heavier than practically any other hardwood flooring, but it's also fragile. It's almost more like a ceramic than a wood in this way. You will need good quality and very sharp tools to effectively work with it, and you will probably need to replace or sharpen your saw blade if you're doing more than one room. If your tools are all ready you can move into the install phase. 

Second, when tapping this product, always, always use some sort of tapping block or rubber mallet. I know I just got done saying how hard this product is, but if you hit it with a metal hammer on the end as you're tapping it into place lengthwise, you could very well fracture the finish. In the process of installing my first room with this flooring, I did this a few times, and the finish is not the standard clear coat like a regular hardwood, it's softer looking yet so hard its like trying to sand glass, you will end up cutting the fractured end off most often. It's almost like fiberglass if it breaks, it's prone to giving out very nasty slices and splinters. 

Third, back to the sharp tool comment, if you wait until your blade gets too dull to change it out, you may get a very sloppy cut edge and have to re-do a cut, When the saw stars tearing out even a little, and you run a board with the finish side up through the table saw or chop saw, you will get a sloppy edge that does not mate up with the nice factory edge. 

Fourth, the floor nailer (link to what I'm using) . Be prepared to run your floor nailer on its highest input PSI, and give it a good whack. Due to the density and hardness of this product, you will need to really drive the cleats in. If you get one that is only in half way (you will) I have found that the only choice is to cut them off, flooring cleats are too soft to hammer into anything but maybe...butter? and the wood being so hard also makes it impossible to pull them out. If you have to do this, having an oscillating tool like a Dremel Multi Max will be a god send. Get a carbide blade, or two.


If you're careful about cutting and tapping, the strand woven carbonized bamboo flooring can look great and last a long time. I used Morning Star Strand woven carbonized 3 3/4 x 5/8 in this photo (the baseboard is not done yet )
Strand woven carbonized 3.75" x .625" bamboo flooring


Strand woven carbonized 3.75" x .625" bamboo flooring
Strand woven carbonized bamboo flooring